
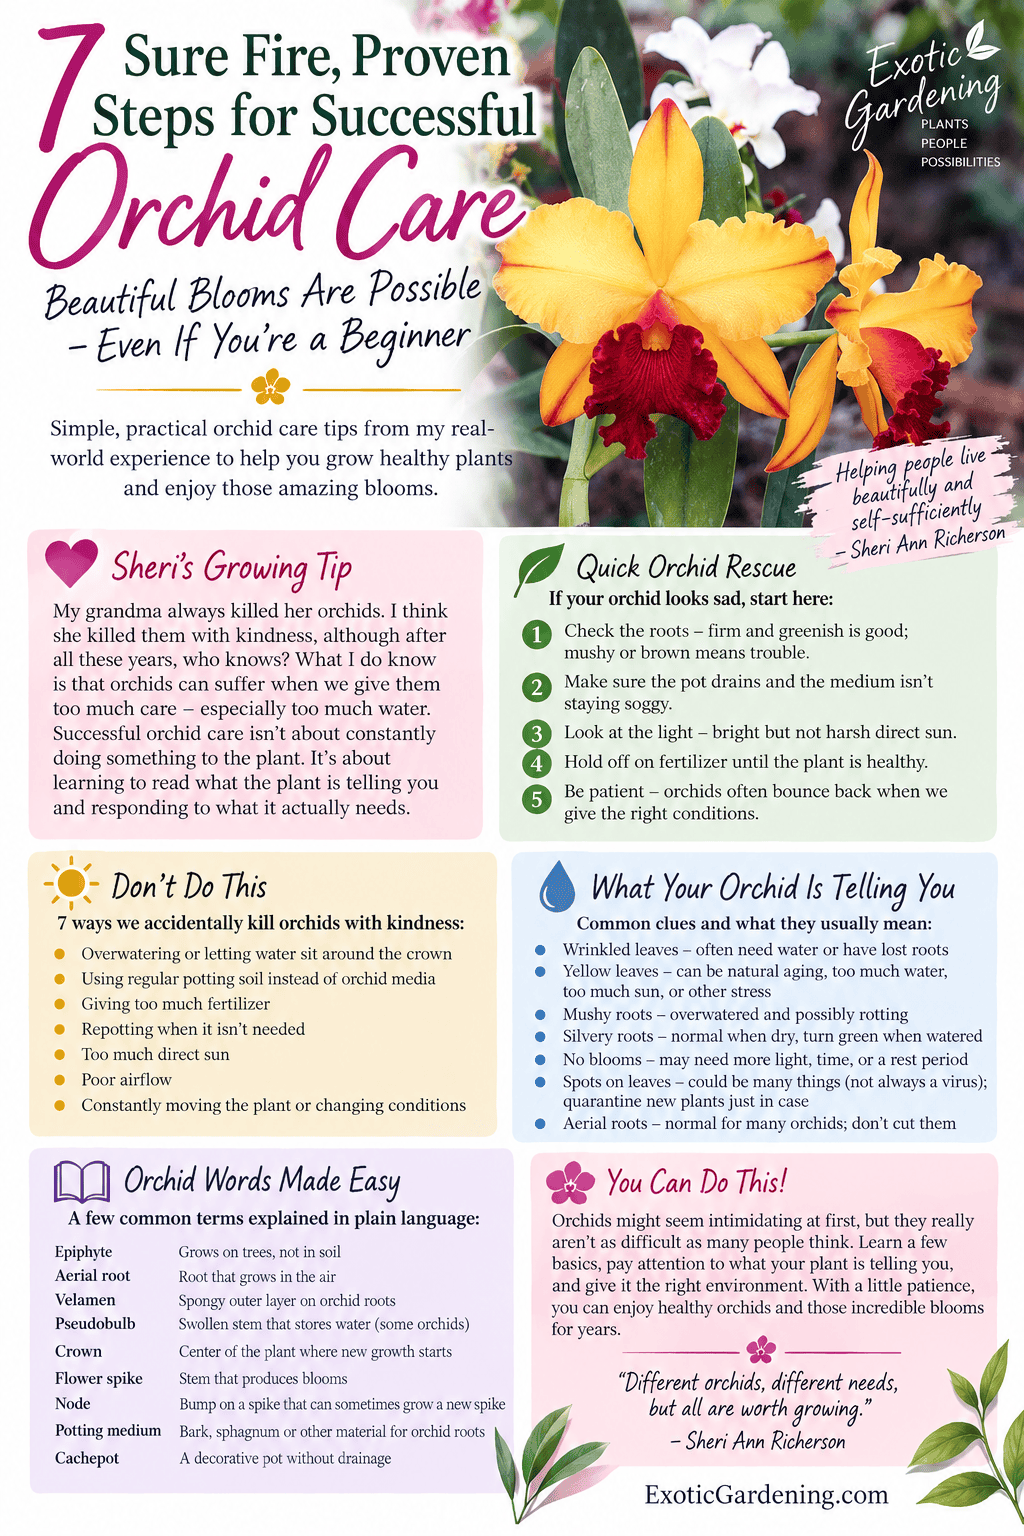
Successful Orchid care is not hard if you understand the basic needs of this plant and provide them with what they need to thrive. My grandma always killed her orchids. I think she killed them with kindness, although after all these years, who knows? That memory is one reason I want to make orchid care less mysterious. These plants do not need us hovering over them. They need us to learn what they are telling us through their roots, leaves, potting mix and growth.
It’s no wonder that people fall in love with the beautiful, exotic looking flowers of the orchid family as the flowers are quite showy.
Orchid flowers come in a variety of colors, the plants themselves come in various sizes and they make great house plants.

Basics Of Successful Orchid Care
Unfortunately, caring for Orchids involves more than getting the plant, watering it and feeding it at regular intervals.
Before we get into the individual steps, there is one distinction that can save a lot of frustration: “orchid care” is not one single recipe. The orchid family contains plants with very different growth habits. Some, such as Cattleyas and Oncidiums, have pseudobulbs that store water and can dry more between waterings. Phalaenopsis do not have those same storage organs, so they are generally watered as they approach dryness rather than being left bone-dry for long periods. Some orchids even have pronounced seasonal rest periods. That is why the tag on an orchid matters more than most people realize.
If your orchid came with a plant tag, do not throw it away when you remove the decorative sleeve. At minimum, knowing the genus gives you a much better starting point for light, water, temperature and seasonal care. If it has a full hybrid or species name, even better.
Orchid Words Made Easy
You are going to run into some odd words when you start growing orchids. You do not need to memorize a botany textbook. You just need to know what the words mean when they affect how you care for your plant.
Epiphyte — An orchid that naturally grows attached to another plant or support instead of with its roots buried in ordinary soil. It is not a parasite; it uses the support as a place to grow.
Aerial root — A root growing out in the air instead of down inside the pot. On many orchids this is perfectly normal, so do not cut one off simply because it looks untidy.
Velamen — The spongy outer covering on many orchid roots. On a Phalaenopsis, it can make a dry healthy root look silvery-gray and a wet root look greener. You do not have to remember the word; remember what that color change can tell you.
Pseudobulb — A swollen stem found on some orchids that stores water and nutrients. Think of it as a little storage tank. Phalaenopsis do not have pseudobulbs, which is one reason watering advice cannot be identical for every orchid.
Crown — On a Phalaenopsis, this is the growing center at the top of the plant where new leaves emerge. Water that remains trapped there can cause trouble, so I do not leave the crown sitting wet.
Flower spike — The stem that produces the orchid's flowers. It is different from a root even though a brand-new spike and a new root can confuse beginners at first.
Node — One of the little joints or bumps along a flower spike where a side branch or growth can sometimes develop.
Potting medium — The bark, sphagnum moss or other material around the roots. I call it medium rather than soil because most common epiphytic orchids should not be planted in ordinary garden soil.
Cachepot — The pretty outer pot that hides the nursery pot. It may not have drainage holes. If your orchid is sitting inside one, make sure drained water is not collecting around the inner pot.
What Orchids Are Actually Asking Us To Provide
Most of the orchid-care problems I see make more sense when you stop thinking of the plant as a mysterious flowering houseplant and start thinking about where its roots are adapted to live. Many of the orchids commonly sold as houseplants are epiphytes. In nature their roots may cling to trees or other supports where they receive moisture but also plenty of air. They are not growing with their roots buried in dense, constantly wet garden soil.
That explains the chunky bark, moss, slotted pots and roots wandering out into the air. Those strange-looking roots are not the orchid misbehaving. They are part of how the plant grows. A good orchid potting setup has to balance moisture with oxygen around the roots.
Successful orchid care therefore comes down to a relationship among light, water, air movement, humidity, temperature, potting medium and nutrition. Change one and you can change the others. A plant in warm, bright, breezy summer conditions can use water much faster than the same plant sitting in a cooler house during winter. A fine, moisture-retentive mix behaves differently from coarse bark. This is why I would much rather teach you how to read the plant than hand you a rigid watering schedule.

A Quick Note About Moth Orchids Versus “All Orchids”
If you bought a flowering orchid at a grocery store or garden center, there is a good chance you brought home a Phalaenopsis, commonly called a moth orchid. They are popular for good reason: the blooms can last a long time and the plants adapt well to normal household conditions.
Much of the beginner advice in this guide applies especially well to Phalaenopsis, but I will point out where genus matters. If you grow Cattleya, Dendrobium, Oncidium, Paphiopedilum, Vanda or something more unusual, use the principles here as your foundation and then learn the needs of that particular orchid. That is also part of the fun of growing them.
These plants - especially the Blue Orchid - are very in-demand, and most growers create a booming business selling them but often fail to provide adequate care tips with the plants.
Whether or not you’re new to this flowering plant, you can benefit from knowing how to get the healthiest flowers from your efforts.
Start With A Healthy Plant
You want to make sure that the plant you select will give you beautiful blooms which is why starting with a healthy plant is so important.
Some people buy very small Orchid plants in order to save money and then don’t understand why they don’t flower right away.
It can take years for a new plant to flower and thus what you want to do is select one that is in bloom.
This also helps to make sure the flowers on the plant you choose are ones you will like.
Some Orchids have fragrant flowers and some do not.
Choosing plants that are in bloom is the only way to know for sure if your Orchid is fragrant or not.
It is ok to buy ones on sale with faded flowers because while they may not flower again for a while, you know they are of blooming size.
Buy Plants With Healthy Leaves
If the leaves are pale or look spotted, then the plant isn’t healthy and it is best to not purchase it.
If you already have Orchids at home and the leaf color isn’t consistent, then something’s wrong with the plant.
Spotted leaves are a reason to slow down and inspect an orchid carefully, but spots alone do not prove the plant has a virus. Sunburn, fungal or bacterial disease, physical damage, pests, nutrition problems and other stresses can also cause discoloration. If a plant looks suspicious, I would rather quarantine it away from the rest of my collection while I figure out what is happening than risk exposing healthy orchids.
Why A Virus Is Bad News
A virus can easily spread to your entire orchid collection and kill your plants.
In the event one of your Orchids gets a virus, be sure to separate it from your healthy plants right away.
If an orchid is confirmed to have a virus, there is no treatment that removes the virus from the plant. Keep it isolated from healthy orchids and avoid sharing cutting tools between plants without sanitizing them. Because viral symptoms can resemble other kinds of damage, appearance alone is not a reliable laboratory diagnosis.
A strange spot does not automatically mean “virus.” Sunburn, bacterial and fungal disease, insects, physical injury and cultural problems can create confusing symptoms. What you can do immediately is move a suspicious orchid away from the rest of the collection and sanitize tools between plants. That protects your collection while you investigate.
What Healthy Orchid Leaves Can - and Cannot - Tell You
Leaves are useful clues, but they are not a complete diagnosis. A healthy leaf should generally be firm for its type. Limp or wrinkled leaves can indicate dehydration, but the cause of that dehydration might be too little water or damaged roots that can no longer absorb the water you are already giving. This is why I keep coming back to the roots.
Yellowing also needs context. An old lower leaf eventually yellowing and dropping is different from several leaves suddenly yellowing. Black or brown patches can have multiple causes. When a change appears, ask what changed around the plant: light, temperature, watering, potting medium, pests or a recent move.
Proper Watering Is Important
Give your plant the water amount that’s suitable for the type of orchid that you have. There is no magic orchid-watering day that works for every plant. The orchid, its pot, the potting medium, the temperature, humidity and season all affect how quickly it dries. This is one of those times when learning to read the plant is far more useful than blindly following a calendar.
Water thoroughly when your orchid needs it, especially when warm summer conditions make the potting medium dry faster. Thorough watering and frequent watering are not the same thing. When I water, I want the medium evenly moistened and excess water able to drain away. I do not want the pot sitting in stagnant water.
The moss and bark orchids grow in can dry quickly during hot weather, but the material matters. Sphagnum moss can hold much more moisture than chunky bark, and old decomposed bark stays wetter and admits less air than fresh bark. The same orchid can therefore need a very different watering frequency after repotting into a different medium.
Be sure to keep an eye on the roots to make sure you’re maintaining a healthy moisture level.
Healthy Orchid roots should feel firm and plump. On many Phalaenopsis, wet roots appear greener while dry exposed roots can look silvery-gray because of the velamen, the spongy outer root covering that absorbs water. Color by itself is not enough; texture and condition matter too.
Do not assume every pale root is dead. A healthy dry aerial root can look silver or gray. Dead or rotting roots are more likely to be hollow, papery, mushy, blackened or to lose their outer covering when handled. That distinction matters because cutting healthy roots creates stress the plant did not need.
Carefully cut away all dead or damaged roots from the plant during the re-potting process.
Orchids Love Shady Spots Outside
When it’s nice outside, let the plant spend some time outdoors, but not under the direct glare of the sun.
Just like human skin, these plants can sustain a nasty sunburn and then the leaves don't look as nice.
But remember to bring them back indoors once the temperatures begin to drop.
I place my orchids in a spot that receives filtered morning sunlight and afternoon shade.
Another tip is use a hummingbird mister during the hot afternoon to offer extra humidity around the plants.
I make sure to bring them indoors once the temperature falls to 50 degrees Fahrenheit at night.
I use about 50°F at night as my practical signal to get my orchids back indoors. That does not mean every orchid should routinely be kept at 50°F. For example, Phalaenopsis are generally warm-growing orchids, although a period of cooler autumn nights can help initiate flower spikes. Treat my cutoff as part of how I manage my collection, then adjust for the genus you are growing.
Light: Enough To Bloom Without Burning The Leaves
Light is one of the easiest orchid needs to underestimate because a plant can stay alive for a surprisingly long time in a spot that is too dim for good flowering. If your orchid grows leaves year after year but never sends up another flower spike, light belongs near the top of your troubleshooting list.
Phalaenopsis are lower-light orchids compared with many Cattleyas or Vandas. Indoors, bright indirect light is a good starting point, and an east-facing window often works well. Strong midday or afternoon sun through glass can heat and scorch leaves. On the other hand, moving a plant so far from the window that it receives only dim room light can leave it with enough energy to survive but not enough to bloom well.
When I move orchids outdoors, I do not take a plant accustomed to indoor light and suddenly put it into blazing sun. Acclimation matters. Sunburn can happen quickly and the damaged tissue does not magically turn green again.
A plant that refuses to rebloom may need more light, but do not diagnose by leaf color alone. Consider the genus, growth rate, distance from the window and whether the plant is producing healthy new roots and leaves. Make light changes gradually so you do not turn a low-light problem into sunburn.
Humidity And Airflow Need To Work Together
Orchids often appreciate more humidity than a heated or air-conditioned house naturally provides, but humidity is not the same thing as keeping the pot wet. This is exactly why I like using a hummingbird mister around my plants outdoors in hot weather: I can influence the air around them without treating the root zone like a swamp.
Air movement becomes increasingly important as humidity rises. Still, wet air around leaves and flowers encourages problems. Indoors, the goal is gentle circulation, not a fan blasting directly on the orchid until it dries out. Outdoors, natural air movement often does much of this work for us.
If you use a humidity tray, the pot should sit above the water rather than soaking in it. And if you mist, think about when and why you are doing it. Wet foliage late in the day is very different from providing humidity around a plant with enough warmth and air movement for the foliage to dry.
Temperature: Warm, Cool And The Difference Between Survival And Flowering
Temperature advice is another place where “orchids like this” becomes too broad. Phalaenopsis are generally warm growers. Other orchids tolerate or prefer cooler conditions, and some depend on seasonal changes as part of their growth and flowering cycle.
For moth orchids, cooler nights for a period in autumn can help trigger flower spikes, but abrupt temperature swings around developing buds can cause problems. Keep plants away from cold drafts, furnace blasts and leaves pressed against freezing window glass. A comfortable room can contain several very different microclimates depending on the window, vent and time of day.

Fertilize Your Orchids On A Schedule
Be sure to feed your Orchids on a regular schedule per the instructions on the fertilizer you use.
Orchids need nutrients, but fertilizer should support healthy growth rather than compensate for poor roots or inadequate light. Fertilizer salts can accumulate in potting media, particularly when fertilizer is applied too strongly or the pot is not periodically flushed with plain water.
I use a fertilizer that is designed just for orchids.
I prefer using a fertilizer formulated for orchids and following its label rather than assuming that more fertilizer means more flowers. Nitrogen, phosphorus and potassium are important, but orchids also need the rest of their growing conditions to be right before fertilizer can do its job.
The appropriate fertilizer and frequency depend partly on the orchid, potting medium, water quality, season and whether the plant is actively growing. A lightly and regularly fed orchid with healthy roots is a better goal than a heavily fertilized stressed plant.
A balanced orchid fertilizer such as a 20-20-20 type product is one option, but the numbers on the package are not a magic bloom formula. Follow the product directions, reduce feeding when growth and light slow, and occasionally water thoroughly enough to help flush accumulated salts from the medium.
Repot Your Orchids As Needed
When you bring home a new orchid, inspect what is happening inside the decorative presentation. Many orchids are sold in a clear or nursery pot slipped inside a decorative cachepot. The inner pot may be perfectly usable, but you need to know whether water can drain freely and whether the medium is still open and healthy.
Do not repot automatically just because the plant came from a store, but do not ignore deteriorating media either. If the bark has broken down into something resembling mulch, drainage is poor, roots are rotting, or the plant is genuinely outgrowing its container, it is time to act. When the plant is healthy and blooming, I prefer to enjoy the flowers unless there is an urgent root or media problem.
During repotting, use a clean cutting tool to remove roots that are clearly dead, hollow or mushy while preserving firm living roots. Choose an orchid medium appropriate to both the plant and the way you water; a person who tends to water frequently may do better with a more open, fast-draining mix than someone whose plants dry rapidly between waterings.

Watch For Pests On Your Orchids
Keep an eye on your Orchids because they can get infected with pests.
Pests can weaken orchids, distort new growth and spread through a collection before you realize they are there. Common problems include scale, mealybugs, aphids, thrips and spider mites. Look under leaves, around leaf joints, along flower spikes and around the pot instead of inspecting only the flowers.
There are special sprays you can buy and natural methods you can use to treat your Orchid, killing any infestations and keeping new ones at bay.
The key is to catch pests early. I also quarantine new or suspicious orchids instead of immediately tucking them into the rest of the collection. That gives me time to watch for insects and disease symptoms that were easy to miss at the store.
Results Of Successful Orchid Care
By taking the time to properly care for your Orchids, they will yield a crop of flowers that you can enjoy over and over again.
Orchid flowers also last quite a while each time they flower.
They can continue to reward you with future bloom spikes when the plant has the light, roots, nutrition and seasonal conditions it needs.
After The Flowers Fade: Don’t Assume The Orchid Is Dying
This is the moment when many perfectly healthy orchids get thrown away. The flowers fade, the spectacular display disappears, and a beginner assumes the plant is finished. It is not. Flowering is one phase of the plant’s growth cycle.
Keep caring for the leaves and roots. With a Phalaenopsis, an old flower spike may remain green and sometimes branch or flower again, while a brown, dry spike is finished. Some growers cut a green spike above a node hoping for a side branch; others cut it lower so the plant can put its energy into fresh growth and a future spike. Either approach can work, but a weak plant deserves recovery more than it deserves pressure to rebloom immediately.
Use the non-blooming period to evaluate the plant. Is it making a new leaf? Are fresh root tips appearing? Has the bark broken down? Does it need a little more light? Those signs tell me much more about the future of the orchid than an empty flower spike does.
It is easy to focus on the blooms because that is why most of us bought the orchid. But if you want those flowers again, grow the plant first. Healthy roots and leaves are the machinery that makes the next show possible.
Should You Water An Orchid With Ice Cubes?
This is one of those orchid arguments that refuses to disappear. The idea sounds wrong on its face because orchids are associated with tropical climates, but research on Phalaenopsis found that measured ice-cube irrigation did not damage root or leaf health or shorten flower display compared with the same amount of room-temperature water.
That does not mean “three ice cubes” is a universal watering rule for every orchid, pot, medium and home. The useful lesson is about delivering an appropriate amount of water without leaving roots sitting in water. I still prefer learning to read the plant and medium because that skill follows you when the pot size, season, orchid or growing conditions change.
If you own a Phalaenopsis sold with measured ice-watering instructions, research gives us more nuance than simply declaring that ice automatically kills orchids. But I do not want a beginner to replace one rigid calendar rule with another. Check the roots and medium. The plant gets the final vote.
Common Orchid Problems: A Fast Troubleshooting Guide
Wrinkled Or Limp Leaves
Check the roots before adding more water. The plant may truly be dry, or it may have lost roots to rot and be unable to absorb moisture.
Brown, Mushy Roots
Look at drainage, watering frequency and whether the potting medium has decomposed and stays wet too long.
Silvery-Gray Aerial Roots
On Phalaenopsis this can be completely normal when the roots are dry. Do not cut a healthy root just because it is not green.
No Flowers For A Long Time
Evaluate light first, then overall plant health, roots, feeding and the seasonal cues required by your particular orchid.
Black Or Bleached Leaf Patches After A Move
Consider sunburn, particularly if the orchid was suddenly exposed to stronger sun.
Sticky Leaves, Cottony Material, Bumps Or Webbing
Inspect closely for pests and isolate the plant until you know what you are dealing with. My guide to indoor plant bugs, prevention and cure goes deeper into houseplant pest management.
Spots, Rings Or Streaks
Isolate the orchid. Do not declare it virused based on a photograph or one symptom; multiple diseases and cultural problems can look similar.
Orchid Care FAQ
How often should I water an orchid?
There is no universal number of days. Water according to the orchid, potting medium, pot, temperature, light, humidity and season. Phalaenopsis are generally watered thoroughly and then watered again as they approach dryness; orchids with water-storing pseudobulbs may need a drier interval.
Why are my orchid’s roots growing out of the pot?
Aerial roots are normal for many epiphytic orchids. Roots outside the pot are not automatically a request for a larger pot. If those roots are firm and healthy, leave them alone.
Can I put my orchid outside for summer?
Many orchids benefit from suitable outdoor summer conditions, but match the light and temperature to the genus and acclimate plants gradually. I use filtered morning sunlight and afternoon shade for mine and bring them back inside when nights fall to about 50°F.
Why won’t my orchid bloom again?
Insufficient light is a common reason, but it is not the only one. Check whether the plant is otherwise healthy, producing roots and leaves, receiving appropriate nutrition and experiencing the temperature or seasonal cues its genus needs.
Should I cut orchid roots that are outside the pot?
No—not merely because they are outside the pot. Cut roots only when they are genuinely dead or rotted. Healthy aerial roots help the plant and are part of the reason orchids look so wonderfully strange.
Is my orchid dead when the flowers fall off?
No. Flowers are temporary. If the leaves, crown and roots remain healthy, continue caring for the plant. The goal is to grow a strong orchid capable of producing another display.
Keep Exploring Orchids And Exotic Houseplants
If your orchid is a Phalaenopsis, you may also want to read Tips For Making A Moth Orchid Last. If pests are the problem, use my Indoor Plant Bugs: Prevention and Cure guide. And if orchids have you wanting even more unusual plants indoors, explore Easy Exotic Houseplants That Thrive Indoors in Containers and my collection of Indoor Flowering Tropical Plants.
Don’t let the thought of the kind of care they need overwhelm you because let's face it, all plants need proper care to thrive.
Once you get the hang of successfully growing orchids and getting them to rebloom, you’ll be glad that this was the flower you chose to grow in your home.
My grandma always killed her orchids. I think she killed them with kindness, although after all these years, who knows? What I do know is that orchids can suffer when we give them too much care—especially too much water. Successful orchid care is not about constantly doing something to the plant. Learn to read the roots, leaves and growing medium, then respond to what the orchid actually needs.
First, Know What Kind Of Orchid You Have
One of the problems with generic orchid-care advice is that orchids are an enormous and diverse plant family. A Cattleya, Dendrobium, Oncidium and Phalaenopsis do not necessarily want identical treatment. Much of the advice people encounter for an orchid bought at a grocery store, garden center or big-box store is really advice for Phalaenopsis, or moth orchids, because those are among the orchids most commonly grown in homes.
If your orchid still has its tag, keep it. The name is not just for collectors. It is your roadmap to the plant’s preferred light, temperature, moisture and seasonal care. If there is no tag, identifying at least the genus can help you make much better decisions.
Before reaching for the watering can, fertilizer or pruning shears, look at the whole plant. Are the roots plump or shriveled? Is the potting mix still damp? Are the leaves firm or limp? Is there new root or leaf growth? Orchid care becomes much easier when you stop treating every symptom as a request for more water.
How To Read Orchid Roots Before You Water
Roots are one of the best diagnostic tools an orchid grower has. Healthy Phalaenopsis roots are generally firm and plump. Exposed roots often look silvery or gray when dry and become greener when hydrated. Brown, black, mushy or hollow roots are a different story and can indicate dead or rotting tissue.
This matters because an overwatered orchid can look dehydrated. Once roots rot, the plant cannot take up water efficiently, so the leaves may become limp or wrinkled. Pouring on even more water because the leaves look thirsty can make the underlying problem worse.
Pick up the pot. Learn what it feels like freshly watered and what it feels like as it approaches dryness. Look through a clear orchid pot if you have one. Feel the potting medium. With Phalaenopsis, I want the plant thoroughly watered and then allowed to approach dryness rather than sitting continually soggy.
“Water every Sunday” sounds wonderfully simple, but your orchid does not own a calendar. A plant in bark may dry much faster than one packed in sphagnum moss. Summer conditions can be completely different from winter conditions. Check the plant and medium first.
Seven Ways We Accidentally Kill Orchids With Kindness
Sometimes the problem is not neglect. It is enthusiasm. If you are trying very hard to be a good orchid parent and the plant keeps declining, look at whether you may be doing too much of a good thing.
- Watering too often. Constantly wet potting media deprives roots of the airy conditions many commonly grown orchids need.
- Letting the pot sit in water. Water thoroughly, but allow excess water to drain instead of leaving the root zone waterlogged.
- Leaving water in the crown overnight. With Phalaenopsis, water trapped where the leaves meet can encourage rot. Morning watering gives splashed foliage time to dry.
- Fertilizing a stressed plant harder. Fertilizer is not medicine. More fertilizer cannot compensate for rotting roots, poor light or broken-down potting media, and excess salts can damage roots.
- Repotting repeatedly because the roots look strange. Aerial orchid roots are normal. Roots growing outside the pot are not automatically a sign that the plant needs a much larger container.
- Giving a shade-adapted orchid sudden direct sun. Moving plants outdoors is wonderful when conditions are appropriate, but acclimate them. Leaves can sunburn surprisingly fast.
- Changing everything at once. New pot, new location, more fertilizer, more water and a sudden change in light makes it difficult to know what helped—or what caused the next problem.
How I Summer My Orchids Outdoors
I like giving my orchids time outdoors when the weather allows it. My spot receives filtered morning sunlight and afternoon shade. During hot weather I have also used a hummingbird mister to increase humidity around the plants. That does not mean keeping the roots constantly wet; humidity around a plant and waterlogged potting media are two very different things.
I bring my orchids indoors when nighttime temperatures fall to about 50 degrees Fahrenheit. That is my practical cutoff here. Your exact timing should also take the orchid type into account, because temperature tolerance varies.
Outdoor time comes with another job: inspection. Before plants come back into the house, check leaves, leaf joints, flower spikes, pots and potting media carefully for hitchhiking pests.
When An Orchid Needs Repotting
Do not repot simply because the top of the plant looks large. Think about what is happening below. Orchid potting media eventually decomposes and becomes finer and more water-retentive. When bark that once allowed plenty of air around the roots breaks down, roots can remain wet too long.
Repot when the medium is breaking down, roots are suffering, or the plant has genuinely outgrown its situation. Fresh medium does not automatically mean a dramatically larger pot. Orchids often do better when the container fits the root system rather than the size of the foliage.
Have the new orchid medium, clean pot and sanitized cutting tool ready before you remove the plant. Once the roots are exposed, trim roots that are clearly dead, hollow or mushy while preserving healthy firm roots. If an orchid is flowering happily and there is no urgent root or media problem, I generally prefer not to disrupt the display just because I am impatient to repot it.
My Orchid Is Alive But Won’t Bloom—Now What?
A living orchid that refuses to flower is not necessarily an unhealthy orchid. Start with light. An orchid can receive enough light to remain alive and green without receiving enough to bloom well. This is particularly worth investigating when a Phalaenopsis keeps producing leaves but no flower spike.
Next, look at the roots and overall growth. A plant struggling with root loss needs to rebuild before I worry about forcing flowers. Also consider whether you are overfeeding it. Lots of lush vegetative growth is not the same thing as good flowering.
Finally, know your orchid. Phalaenopsis can respond to a period of cooler autumn nights as part of flower-spike initiation, while other genera have different seasonal cues. This is another reason that knowing the name on that little plant tag pays off.
Quick Orchid Rescue: What To Check First
If you are standing in front of a sad orchid and have no idea what to do, resist the urge to immediately water it. Work through this order instead:
- Identify it as closely as you can.
- Inspect the roots. Firm and plump is very different from brown and mushy.
- Check the potting medium. Is it fresh and airy, or decomposed and staying wet?
- Evaluate light. Is it bright enough for the orchid you are growing without scorching the leaves?
- Look for pests or disease. Check both sides of leaves, joints and the pot.
- Quarantine suspicious plants from the rest of your collection while you determine what is wrong.
- Change the thing that is actually wrong rather than changing every part of its care at once.
Successful Orchid Care Is More Observation Than Fussing
If there is one thing I want you to take away from this guide, it is that orchids are not impossible plants reserved for experts. They are plants with particular needs. Once you understand those needs, the mystery starts disappearing.
Maybe my grandma really did kill her orchids with kindness. I cannot go back and inspect their roots to find out. But I can help you avoid doing the same thing. Start with a healthy plant, learn what kind of orchid you have, pay attention to the roots, give it appropriate light and moisture, and resist the temptation to solve every problem by doing more.
Sometimes successful orchid care is knowing when to help—and when to leave a perfectly content orchid alone.






Leave a Reply